
Amputee Guide
Kiser’s Orthotic and Prosthetic Services
Kiser’s Orthotic and Prosthetic is a boutique clinical orthotics and prosthetics practice founded in 1987. We are passionate about providing individualized treatment using the most advanced orthotic and prosthetic technologies available. You will notice a difference the first time you enter our office, where you will be treated like family by our staff. In addition to providing excellent clinical care in a comfortable environment, we strive to be a resource for our patients and the O&P community. We provide each patient with extensive clinical education and the support and encouragement needed to pursue their personal goals. Whether you want to walk comfortably in your home, climb mountains or run a marathon, we will work with you every step of the way to help make your dream a reality.
Kiser’s Orthotic and Prosthetic Services, Clinical Staff:
Frances Kiser, CPO
Michael Kiser, CO
General Information for Amputees
Losing a limb to amputation can cause many different emotions to come up. At first you may feel that you are no longer a whole person. You may fear that others will stare at or avoid you. You may be afraid to show your limb to your partner or fear that your partner will feel differently about you after your limb loss. These feelings are a normal part of the adjustment process, and they will probably pass with time. You are not alone in your recovery. Learning to walk again and care for your limb will take some time, but with the help from your doctor, your therapists and your prosthetist you will regain the independence you desire. This guide was put together to help you, the amputee, understand the process that will occur after your amputation. Additional resources are provided on the last few pages.
Timeline & What to Expect
The healing process after your surgery will vary depending on the cause of amputation and your overall health. In order to begin the prosthetic fitting process, your wound must be healed and the swelling decreased. If there are no complications, the first fitting usually occurs four to five weeks after amputation, but ultimately your doctor will decide when you are ready to begin. The fitting process may vary with different patients, but the following guide will give you an idea of what to expect.
1st Visit: Evaluation
Once your doctor has determined that you are ready for prosthetic fitting, you are ready to visit us at Kiser’s Orthotic and Prosthetic Services for an evaluation. At this time, your prosthetist will ask you many questions about your lifestyle, your vocation, your hobbies, your future plans, and your expectations for using your prosthesis. An evaluation of your strength and range of motion will be performed and the condition of your residual limb will be examined. We will discuss the prosthetic options available to you based on these assessments. If your health insurance carrier requires prior approval, this will be taken care by our office staff. Some insurance carriers can take several weeks to review your case and reach a decision.
2nd Visit: Measuring and Casting
Before casting, we also take a look at your residual limb for any prominent bones, sensitive areas, and swelling. To ensure a proper socket fit, it is very important that your leg not be swollen when we take a cast. If you are swollen, you will need to wear a shrinker to remove fluid from your limb and make another appointment for the casting of your residual limb.
If your prosthetist determines that you are ready for casting, he/she will take measurements and a cast of your residual limb along with measurements of your sound leg to make sure the height of the prosthesis is accurate. Once the cast is set, the prosthetist will remove it from your limb and use it as a model to fabricate, or build, your prosthesis.
3rd Visit: Diagnostic Fitting
It can take several diagnostic fittings to produce a well fitting, well functioning artificial limb. Your prosthetist will normally focus on the fit of the socket first. A clear plastic diagnostic socket may be fitted so that your prosthetist can actually see where the socket fits well and where modifications are needed. Your prosthetist will eventually attach your components to this test socket to ensure that everything is in the proper position. Depending on the situations encountered during this appointment, you might need another diagnostic socket made which will mean an additional visit.
4th Visit: Dynamic Alignment
When you come to this appointment, you will need to bring with you the pair of shoes that you will be wearing the most often with your prosthesis. At this visit, you will be able to stand and take steps with the prosthesis in the parallel bars. We will check for correct height and also change the alignment of the prosthesis by adjusting the angle of the foot, knee, and hip as applicable to your amputation level. Changing the alignment is meant to improve your gait (how you walk) and give you the greatest stability and comfort. Once your prostheses is correctly aligned, your prosthetist will transfer this alignment to the finished prosthesis.
Note: Depending on the prosthesis and method of suspension, the diagnostic fitting and dynamic alignment stages may be combined into one visit.
5th Visit: Delivery
This is the day that you will receive your finished prosthesis along with a supply of prosthetic socks. Your prosthetist will make sure that you know how to operate all of the features of the prosthesis and will give you information about care and maintenance required for your device. You will be educated on the proper donning of your prosthesis and how to determine the correct number of prosthetic socks to wear.
If this is your first prosthesis, do not expect to wear it all the time right away. We recommend a short period of time the first day and then you will gradually increase the wearing time each day. You should check the skin on your residual limb before and after you remove your prosthesis for signs of irritation and/or redness. Redness over a large area that dissipates after removal of the prosthesis is normal. If you have localized redness caused by pressure, please contact our facility for an appointment so that changes can be made.
It is important to schedule your first physical therapy appointment as soon as possible. It is also very important that you follow the safety guidelines set by your prosthetist and physical therapist.
We will make a follow-up appointment for 1-2 weeks after you receive your prosthesis. At this time we can address any concerns or problems you are having. If you begin to experience discomfort before this appointment, call our office to schedule an earlier appointment.
If you start to experience discomfort after a period of time, remember that your prosthesis has probably not changed. It is more likely that your residual limb has undergone a physical change, causing the prosthesis to no longer fit in the same way. Often this discomfort can be relieved by adding or removing prosthetic socks.
Follow-Up
After your prosthesis is finished, you will return occasionally for adjustments and minor repairs. Contact your prosthetist if you notice that your socket is fitting differently or that any parts of the prosthesis are worn or not working properly. To obtain the best results from your new prosthesis, it is recommended that you start by wearing it on a gradually increasing basis unless you have been instructed otherwise.
Notify our office at once if any redness indicating pressure marks lasts longer than approximately 20 to 30 minutes, particularly during this introductory period. Should you experience pain other than the normal pressure of wearing a prosthesis, discontinue wearing the prosthesis, wrap your residual limb with an ACE bandage or shrinker, and call immediately to schedule an appointment. Frequent changes to clean prosthetic socks will keep you comfortable, especially if you experience excessive perspiration.
Amputation Levels
Lower Limb
Partial Foot
Amputation of part or all of the foot including individual toes
 Ankle Disarticulation = Symes
Amputation through the ankle without cutting the tibia and fibula bones
Transtibial = Below Knee
Amputation through the tibia and fibula bones
Knee Disarticulation
Amputation through the knee without cutting the femur bone
Transfemoral = Above Knee
Amputation through the femur bone
Hip Disarticulation
Amputation through the hip with full removal of the femur bone
Hemipelvectomy
Amputation with removal of all or part of pelvis
Upper Limb
Partial Hand
Amputation of part or all of the hand including individual digits
 Wrist Disarticulation
Amputation through the wrist without cutting the radius and ulna bones
Transradial = Below Elbow
Amputation through the radius and ulna bones
Elbow Disartculation
Amputation through the elbow without cutting the humerus bone
Transhumeral = Above Elbow
Amputation through the humerus bone
Shoulder Disarticulation
Amputation through the shoulder with full removal of the humerus bone
Interscapulothoracic = Forequarter
Amputation with removal of all or part of scapula and clavicle
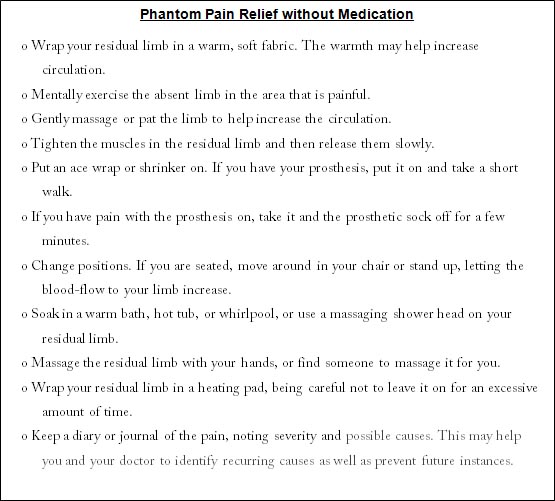
Phantom Pain Vs. Phantom Limb Sensation
What is phantom limb sensation and phantom pain?
Phantom pain and phantom sensations are described as feelings that an individual experiences relating to a limb or an organ that is not physically part of the body. Phantom pain feels like it is coming from a body part that's no longer there, while phantom limb sensations sometimes feel as if the amputated limb is still there. Phantom limb sensations may include feelings of cold, warmth, itchiness or tingling, but should not be confused with phantom pain. Similarly, pain from the remaining stump of an amputated limb is not the same as phantom pain. The important thing to know is that phantom limb sensations are perfectly normal and almost all people with amputations experience them to some degree.
How long does phantom limb sensation and pain last?
The exact causes of, and explanations for phantom pain are a subject of much debate. Phantom pain differs greatly between patients, so what relieves pain for one person may not work for another. For decades, doctors believed this post-amputation phenomenon was a psychological problem, but experts now recognize a physical cause for this pain and that it actually originates in the brain. For some people, phantom pain gets better over time without treatment. For others, managing phantom pain can be challenging.
For most people with an amputation, the sensation decreases in frequency and strength during the first few months, but never goes away fully. Even after 10 or 20 years some people still feel like their limb is still there. Phantom limb sensations can go away in many different patterns. For most people with amputations, the sensations simply become weaker and happen less often. Sometimes the upper part of the limb will fade away and the foot or hand sensation will remain or as if the limb is getting shorter, which is called "telescoping." You and your doctor can work together to treat phantom pain effectively with medication or other therapies.
Shaping Your Limb
Swelling is a natural reaction to the trauma of surgery and will continue throughout the healing process. Treatment of swelling is relatively simple: compression, elevation, and activity. Compression is applied in the form of a “shrinker” which also serves to shape your residual limb. The shrinker should be worn at all times.
The shrinker will help prevent swelling while shaping the limb in preparation for a prosthesis. Following surgery, you may have a limb that is bulbous in shape due to post-surgical swelling. By applying a shrinker to your limb, this will push fluids out of the limb to allow the shape to become for cylindrical.
Residual Limb Hygiene
Daily washing of your residual limb and prosthetic socks is important. It is also advisable to wipe the inside of the prosthetic socket daily with a clean, damp cloth. The limb, socket, and socks should all be completely dry before redonning.
Following amputation surgery, it is important to take good care of the skin of your residual limb. These skin care tips should promote healing, reduce irritation of the skin, decrease pain in your leg, and increase your chances of success with a prosthesis, or artificial limb.
• Wash your residual limb each night with mild soap and lukewarm water, rinsing thoroughly with clean water. Avoid soaking your residual limb for long periods of time as this may soften the skin and cause swelling.
• Dry your skin by patting it with a towel, rather than rubbing briskly. Rubbing the sensitive skin of your residual limb may cause skin irritation.
• You should massage your leg early on to get it used to being touched and to make it tougher. You can use soft kneading motions, light tapping, or soft slapping all over your residual limb. You should gradually increase pressure over time as your leg continues to heal. The idea here is to toughen up your leg to get it ready for a prosthesis. You can even massage your leg in this way though your soft dressings. If it is all right with your doctor, we recommend that you begin this type of massage with the first few days after surgery and that you do it for 5 minutes at a time, 3-4 times a day.
• Once your limb is healed, you can massage even harder to make the tissue looser. Scars tend to attach your skin to the bone below and massaging your leg will help to break up the scar tissue. When massaging, put your thumb over the scar and move it back and forth and in small circles to get the underlying tissue to move.
• At least once a day, inspect the skin of your leg with a mirror for skin irritation, blisters, or red marks. Pay attention to the back of the residual limb, skin creases, and bony areas. Also inspect your skin following the removal of soft dressings or your prosthesis. If you find any unusual irritation, blisters, or red marks, consult your physician for the proper treatment.
• To avoid irritation, do not shave your residual limb or apply lotions to the skin until all of your wounds are completely healed.
Prosthetic Socks
The prosthetic socks you receive with both your temporary and definitive prostheses are an integral part of proper fit and comfort. Adjusting the number and ply of socks worn and proper care of your prosthetic socks can make the difference between wearing the prosthesis properly and developing irritations.
Sock Ply
Prosthetic socks come in a variety of materials, sizes, and thicknesses, ranging from one through eight. Characteristics of various plies include
• One Ply: Often called “cast or fitting socks,” these are the thinnest socks (though not as thin as a sheath), and are usually made of cotton. The bottom seam should be worn away from bony areas.
• Multi-Ply: This sock is made of wool, wool blend, synthetics, or cotton, and is approximately equal to the number of single ply socks indicated on the label.
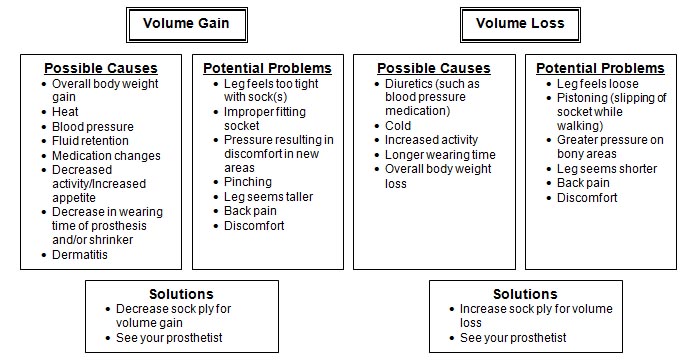
Your Prosthetist will inform you of the proper ply you are to wear. If you are allergic to wool, tell your Prosthetist. Wool socks are commonly used since they maintain their shape, act as a “wick” in absorbing perspiration, and keep an air cushion between skin and socket. It is also a good idea to write the ply number on the sock with a waterproof magic marker. This will help you to keep track of the ply of each sock. Different ply socks are provided to control residual limb volume fluctuations which can occur daily, or even from morning to night.
The following is a guide to ply changes relative to volume gain and loss:
Your Prosthesis and Shoes with Various Heel Heights
Your prosthesis was designed for wear with shoes of a specific heel height. Heels that are higher or lower will alter prosthetic alignment and may cause stability problems. Always check with your Prosthetist before switching heel heights to ensure proper function and comfort. And, remember that your prosthesis should always be worn with shoes. If you want to wear shoes of various heel heights, make sure to mention that to your Prosthetist.
Prosthetic Terminology
 • Socket - The most important component of your prosthesis is the socket. The socket is custom-made for each individual so that it fits snugly to the residual limb. A snug fit prevents skin irritation, increases comfort, makes the limb feel lighter, and gives you better control over your prosthesis. Your residual limb must now do the job that your foot once did. You will walk on your limb through the design of the socket. You cannot put all of your weight on the end of your limb because this would be painful. Instead, your prosthetist will design the socket so that your weight is spread throughout your entire limb. Some, but not all, sockets will include a soft removable liner that adds cushioning to your residual limb. Socks can also provide cushioning.
• Pylon – Connects the socket to the foot. Some feet have integrated pylons that allow for energy return and dynamic response
• Foot – Depending upon your strength, activity level, and goals, you and your prosthetist may choose from hundreds of feet for your artificial limb. Designs are constantly being improved to provide the most comfort and best function.
• Covering & Skin - Most definitive endoskeletal prostheses will have a custom-shaped foam cover that is wrapped around the pylon. You may also choose to leave your components exposed without a foam cover if wish. A foam cover may be used along with nylon stockings or with a flexible protective "skin" that made of vinyl or silicone.
• Suspension - Your prosthesis needs to hold on to your residual limb in some way. This is referred to as "suspension." A well-suspended artificial limb feels lighter, is easier to control, and avoids skin problems. The type of suspension system that you and your prosthetist choose will depend upon your body shape, strength, activity level, skin condition, and, of course, your preferences.
• Sleeve Suspension
• Anatomical Suspension
• Gel Liner with Pin Lock or Lanyard Suspension
• Vacuum Assisted Suction Suspension
• Supracondylar Cuff Strap
• Joint and Corset
• Waist Belt
Exercises for Transtibial Amputees
Note: Please be sure to check with your doctor or physical therapist before beginning this or any other exercise program. Your current level of fitness, your general health, and the condition of your residual limb are all factors that will play a role in how rigorously you can exercise. Always wear your elastic bandage, shrinker sock, or cast to protect your residual while performing these exercises.

Exercises for Transfemoral Amputees
Note: Please be sure to check with your doctor or physical therapist before beginning this or any other exercise program. Your current level of fitness, your general health, and the condition of your residual limb are all factors that will play a role in how rigorously you can exercise. Always wear your elastic bandage, shrinker sock, or cast to protect your residual while performing these exercises.

Resources
A number of valuable resources are available online for individuals and family members of amputees. The following are a few good resources to use for self education.
Full text online library project
Lots of links to resources
War Amps of Canada National Amputee Centre
The Amputee Coalition of America (ACA) is a national, non-profit amputee consumer educational organization representing people who have experienced amputation or are born with limb differences. The ACA includes individual amputees, amputee education and support groups for amputees, professionals, family members and friends of amputees, amputation or limb loss related agencies, and organizations
• Adjustment
• Advocacy
• Children’s Information
• Disease
• Funding
• General Health
• General Prosthetics
• Lower Limb
• New Amputee Information
• Pain
• Peer Support
• Prevention
• Rehabilitation
• Senior Information
Amputee Coalition of America
900 East Hill Avenue, Suite 285
Knoxville, Tennessee 37915-2568
Toll-free: (888) 267-5669
Knoxville: (865) 524-8772
TTY: (865) 525-4512
Fax: (865) 525-7917